Warehouse Capacity Floor Zone Planning for Managers
Warehouse capacity floor zone planning is the practice of dividing a facility into distinct functional zones, each with defined capacity limits and measurable operational triggers, to maximize storage volume and maintain throughput under variable demand. The industry term for this discipline is zone-based layout planning, and it integrates physical floor design with digital controls like a Warehouse Management System (WMS) to manage space dynamically. Metrics such as cubic capacity, clear height, and occupancy thresholds drive every decision. When done correctly, this approach lets you absorb seasonal surges without costly rebuilds, reduce congestion, and push utilization toward the 80–85% target that balances efficiency with flexibility. This guide gives you the framework to execute it.
What are the critical zones in warehouse floor planning?
Zone-based warehouse layout planning uses distinct zones with defined capacities and operational triggers to prevent congestion and adapt dynamically during seasonal surges. Each zone has a specific role, and confusing those roles is one of the fastest ways to degrade throughput. Mixing functional zones causes bottlenecks, inventory errors, and safety issues that compound under peak load.
The six zones every warehouse manager should define explicitly are:
- Receiving zone: Inbound product lands here first. Capacity is defined by dock door count, staging depth, and inbound volume per shift. Flexible inbound triage and fast lanes for priority receipts during peak periods prevent dock congestion from cascading into the rest of the facility.
- Quality check zone: A dedicated buffer between receiving and storage. Skipping this zone and mixing QC activity with reserve storage is a common error that creates inventory accuracy problems.
- Reserve storage zone: Your highest-density area. Capacity is measured in pallet positions and cubic volume. Triggers for expansion typically activate when occupancy exceeds 85%.
- Forward pick zone: The active face of your inventory. This zone should hold only what moves in the next replenishment cycle. Keeping it lean reduces travel time and speeds order fulfillment.
- Pack and value-add zone: Fixed footprint with defined workstation counts. Capacity here is measured in units per hour, not pallet positions.
- Staging and outbound zone: Holds completed orders before dispatch. Overflow triggers should connect directly to dock scheduling to prevent staging from bleeding into pick aisles.
Each zone needs a written trigger: a measurable threshold that initiates expansion, contraction, or a process change. Without triggers, zone boundaries erode under pressure, and workers default to wherever space appears available.
Pro Tip: Link your zone triggers directly to WMS rules. When forward pick occupancy crosses 85%, the WMS should automatically generate replenishment tasks. Manual monitoring alone will fail during a surge.
For a deeper look at how these zones interact across a full facility, the distribution center floor zones guide covers operational roles in detail.
How to accurately measure usable warehouse capacity
Usable warehouse cubic capacity is calculated by multiplying usable floor area by clear stacking height, then subtracting space consumed by aisles, columns, and non-storage areas. This single formula separates warehouses that know their real capacity from those guessing at it.
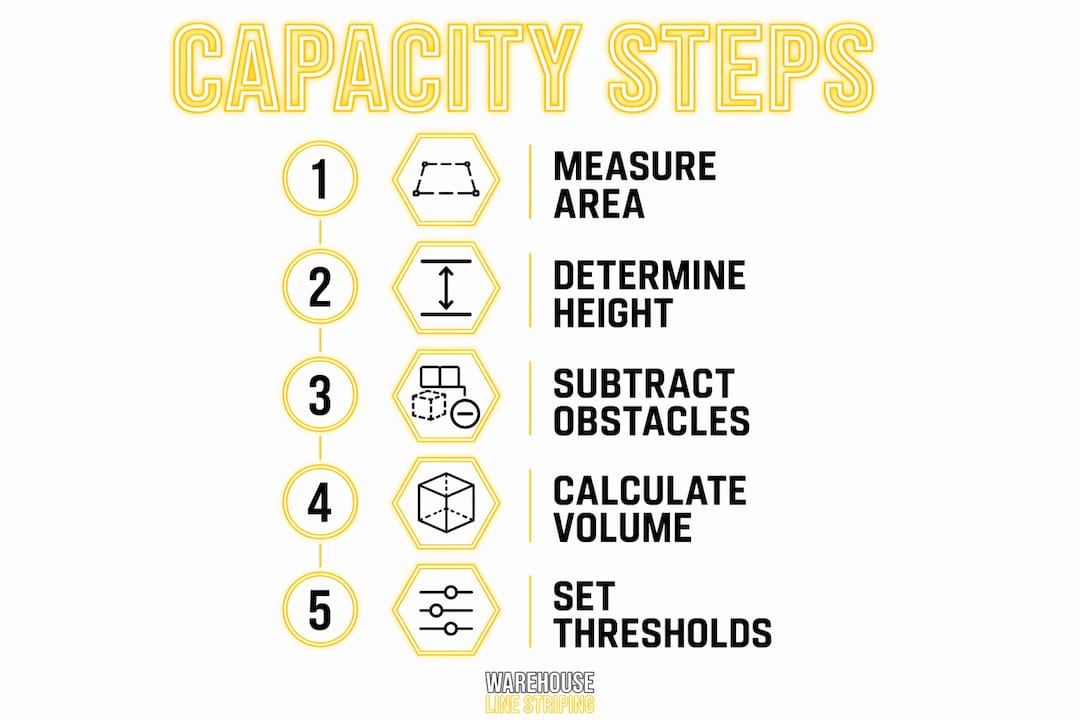
Understanding clear height
Clear height is the vertical distance from the finished floor to the lowest overhead obstruction, whether that is a sprinkler head, duct, beam, or lighting fixture. It is the critical measurement for vertical storage capacity, and it directly determines rack levels and forklift selection. Modern distribution centers often carry 32 to 40 feet of clear height, but your effective stacking height is always lower once you account for real constraints.
Fire sprinkler clearance requirements typically mandate 18 inches between the top of stored goods and sprinkler deflectors. That single code requirement can eliminate an entire rack level if you have not planned for it. Increasing storage height in a retrofit also triggers a review of water supply and pressure, and may require in-rack sprinklers. Measure from the product top to the deflector, not from the floor to the roof.
| Measurement input | What to capture | Common mistake |
|---|---|---|
| Total floor area | All square footage inside the building envelope | Including dock aprons and office space |
| Clear height | Floor to lowest overhead obstruction per zone | Measuring to roof deck instead of sprinkler/duct |
| Column grid | Column spacing and footprint dimensions | Ignoring column base plates in rack planning |
| Aisle allocation | Total linear feet × aisle width per aisle type | Using average aisle width across mixed equipment |
| Non-storage areas | Offices, restrooms, mechanical rooms | Forgetting battery charging stations |
Storage capacity decisions should not rely solely on floor area. Floor load rating, dock configuration, and column spacing all constrain usable volume in ways that square footage alone will not reveal.
Pro Tip: Walk every zone with a laser measure and document clear height at multiple points. Roof pitch, HVAC drops, and sprinkler branch lines create variation that a single measurement will miss.
How does aisle configuration affect floor layout design?
Aisle width, cross-aisle frequency, and corner topology are the three layout variables that most directly trade capacity against operational efficiency. Getting them wrong costs pallet positions permanently.

Dead corners and non-turnable rack configurations can reduce pallet positions by 10 to 20%. That loss is not recoverable without a physical rebuild. Proactively designing corners with adequate clearance and routing recovers those positions before they are ever lost.
| Aisle type | Typical width | Equipment suited | Capacity impact | Trade-off |
|---|---|---|---|---|
| Standard selective | 10–12 ft | Counterbalance forklift | Moderate density | High accessibility |
| Narrow aisle | 8–10 ft | Reach truck | Higher density | Requires trained operators |
| Very narrow aisle (VNA) | 5–6 ft | Turret truck | Maximum density | High equipment cost |
| Cross-aisle | 12–15 ft | All equipment | Reduces storage rows | Required for fire code compliance |
Fire code commonly requires cross-aisles every 100 to 150 feet. That spacing is not optional, and failing to plan for it forces reactive cuts to rack rows after installation. Build cross-aisles into your layout from the first draft.
Strategies that protect capacity while meeting code requirements include:
- Orient rack rows parallel to the longest building dimension to minimize the number of required cross-aisles.
- Use turnable end configurations at rack corners to recover positions that dead-end layouts lose.
- Validate aisle routing with a 2D simulation before committing to physical changes. Autodesk’s warehouse optimization guidance recommends 2D and 3D simulations to shorten operator travel and prevent congestion before a single rack moves.
- Keep forklift turning radii in mind when setting column clearances. A column placed 6 inches too close to a rack end eliminates a full pallet position on both sides.
For compliance specifics on aisle widths by equipment type, the aisle width compliance guide covers OSHA and NFPA requirements in detail.
How does WMS integration support dynamic capacity management?
The biggest failure of zone plans is treating them as static maps instead of systems with measurable triggers paired with WMS controls that enable flexible, real-time changes. A floor plan drawn on paper is advisory. A floor plan enforced by a WMS is operational.
Here is how to operationalize your zone plan with a digital control layer:
- Define slot rules by zone. Assign SKU velocity tiers to specific zones in the WMS. Fast movers belong in the forward pick zone; slow movers belong in reserve. The WMS enforces this assignment at putaway, not at the discretion of the forklift operator.
- Set replenishment triggers. When forward pick occupancy crosses 85%, the WMS generates a replenishment task automatically. This keeps pick faces stocked without requiring a supervisor to monitor zone levels manually.
- Build surge protocols into the system. Pre-configure temporary zone expansions for peak periods. Temporary floor marking and movable carts can create overflow zones for surges without blocking operations. The WMS should recognize these overflow locations as valid putaway destinations during the surge window.
- Audit override frequency. Every manual override of a WMS slot rule is a signal that your zone plan or trigger thresholds need adjustment. Track overrides weekly. A high override rate means your physical layout and your system rules are out of sync.
- Review zone performance monthly. Pull occupancy data by zone, travel time per pick, and replenishment cycle time. These three metrics tell you whether your zone boundaries are still calibrated to your actual SKU mix and demand pattern.
Without WMS enforcement, workers resort to tribal knowledge and override systems during surges, which breaks capacity models and creates rework. The physical layout and the software layer are not separate projects. They are one system.
Pro Tip: Physical zone markings must be backed by digital control layers within the WMS to enforce assignments and triggers. Otherwise, floor markings serve only as advisory and fail during peak demand.
Key takeaways
Effective warehouse capacity floor zone planning requires combining precise cubic measurements, operationally defined zones, code-compliant aisle design, and WMS-enforced triggers into a single integrated system.
| Point | Details |
|---|---|
| Define zones with triggers | Each zone needs a measurable occupancy threshold that initiates a system or process response. |
| Measure cubic capacity accurately | Multiply usable floor area by clear height, then subtract aisles and non-storage areas for true volume. |
| Plan aisle configuration early | Cross-aisle spacing, corner topology, and equipment type must be resolved before rack installation. |
| Integrate WMS from the start | Slot rules and replenishment triggers enforced by the WMS prevent zone collapse during surges. |
| Target 80–85% utilization | Operating above 85% creates bottlenecks; below 70% signals wasted capacity and underperformance. |
Why most zone plans fail before the first surge hits
I have reviewed zone plans that looked excellent on paper and fell apart within two weeks of a peak season. The pattern is almost always the same: the physical layout was designed carefully, but the operational triggers were never written down, and the WMS was never configured to enforce them. When volume spiked, workers did what workers do. They found space wherever it existed, regardless of zone boundaries, and the plan dissolved.
The counterintuitive lesson is that the floor marking and the rack configuration are actually the easier part of this problem. What most operations directors underestimate is the configuration work inside the WMS. Slot rules, replenishment triggers, and surge protocols require deliberate setup and ongoing calibration. A zone plan without that digital backbone is decoration.
The second pattern I see consistently is ignoring cubic capacity in favor of floor area. A facility with 100,000 square feet and 28-foot clear height has fundamentally different capacity than one with the same footprint and 18-foot clear height. Yet I have seen capacity plans that treat both identically because the square footage matched. Measure your clear height zone by zone, account for sprinkler clearance, and calculate cubic volume before you commit to any rack configuration.
The warehouses that sustain capacity gains over multiple peak cycles share one habit: they treat zone performance as a metric, not an assumption. They pull occupancy data, track override frequency, and adjust trigger thresholds quarterly. That discipline is what separates a zone plan that works in January from one that still works in November.
— ET
How floor markings make your zone plan enforceable
A zone plan without visible boundaries on the floor is a plan that workers cannot follow consistently, especially during high-volume periods when cognitive load is highest. Physical floor markings are the enforcement layer that makes your zone boundaries real at ground level.
Warehouse Line Striping installs industrial-grade epoxy floor markings that define storage zones, pick paths, staging areas, and cross-aisles with precision across warehouses and distribution centers nationwide. Their floor marking systems for inventory flow are designed to support zone-based layouts with OSHA-compliant color coding that lasts 3 to 7 years under heavy forklift traffic. With over 10,000 completed projects and 24/7 customer support, Warehouse Line Striping delivers markings that align with your WMS zone structure and hold up through peak season after peak season. Contact them to get a layout assessment and marking plan built around your specific zone configuration.
FAQ
What is warehouse capacity floor zone planning?
Warehouse capacity floor zone planning is the practice of dividing a facility into distinct functional zones, each with defined capacity limits and operational triggers, to maximize storage volume and maintain workflow efficiency. It integrates physical floor layout with WMS controls to enable dynamic adjustments during demand fluctuations.
How do you calculate usable warehouse cubic capacity?
Multiply usable floor area by clear stacking height, then subtract space allocated to aisles, columns, and non-storage areas. Clear height is measured from the finished floor to the lowest overhead obstruction, including sprinkler deflectors, not the roof deck.
What is the ideal warehouse utilization rate?
A target utilization rate of 80 to 85% balances operational efficiency with the flexibility to absorb demand spikes. Operating above 85% creates congestion that degrades throughput; operating below 70% indicates wasted capacity.
How does aisle configuration affect storage capacity?
Dead corners and non-turnable rack configurations can reduce pallet positions by 10 to 20% permanently. Aisle width also determines which material handling equipment you can use, which directly affects storage density across the entire facility.
Why do zone plans fail during peak periods?
Zone plans fail during surges when operational triggers are not defined and WMS slot rules are not enforced, causing workers to override zone boundaries and store product wherever space appears available. Physical markings without a digital control layer function only as advisory guidance and cannot hold under peak load.